Network Forensics and security analysis using python.
Scapy
Scapy is a Python program that enables the user to send, sniff and dissect and forge network packets. This capability allows construction of tools that can probe, scan or attack networks.The idea is simple. Scapy mainly does two things:
Sending packets.
Receiving answers.
You define a set of packets, it sends them, receives answers, matches requests with answers and returns a list of packet couples (request, answer) and a list of unmatched packets. This has the big advantage over tools like Nmap or hping that an answer is not reduced to (open/closed/filtered), but is the whole packet.
In other words, Scapy is a powerful interactive packet manipulation program. It is able to forge or decode packets of a wide number of protocols, send them on the wire, capture them, match requests and replies, and much more. Scapy can easily handle most classical tasks like scanning, tracerouting, probing, unit tests, attacks or network discovery. It can replace hping, arpspoof, arp-sk, arping, p0f and even some parts of Nmap, tcpdump, and tshark).
On top of this can be build more high level functions, for example, one that does traceroutes and give as a result only the start TTL of the request and the source IP of the answer. One that pings a whole network and gives the list of machines answering. One that does a portscan and returns a LaTeX report.
Hence, Scapy can be used as very powerful tool for network forensics and security analysis.
It support python 2.7 and 3
Scapy is cross-platform library –
Ø
Modes of operation
Ø
Interactive shell
Ø
Imported module
For getting
started we will need – Scapy
ü
Ipython for tab completion
Some interesting pcap , we can capture our own or can get by below listed links –
Here we are going to run scapy as an interactive shell –
1) Run scapy
interactive shell
2) Load pcap of
our choice
3) Use scapy
functions
Scapy interactive interpreter
Scapy interactive interpreter uses object oriented programming (OOP) –Syntax-
·
<class>.<functions>(<params>)
·
Rdpcap(“<pcap>”)
Some of pcap class functions
·
Conversations()
·
Sessions()
·
Display()
Running scapy
Scapy’s interactive shell is run in a terminal session. Root
privileges are needed to send the packets, so use sudo for that, just enter "scapy" in terminal and hit enter to start the scapy interactive interpreter.
If you are using a windows operating system than open command promp and type scapy, make sure you have administrator privileges
If you are using a windows operating system than open command promp and type scapy, make sure you have administrator privileges

It is highly recommended to install ipython

The very
first thing is to change your current working directory to the directory which
contains pcap file. Here I have my pcap file stored in downloads folder.

Now we will
learn to import pcap file into scapy and this is done by using the function
called rdcap.
·
Syntax –
Rdpcap(“<pcap>”)
Rdpcap(“<pcap>”)
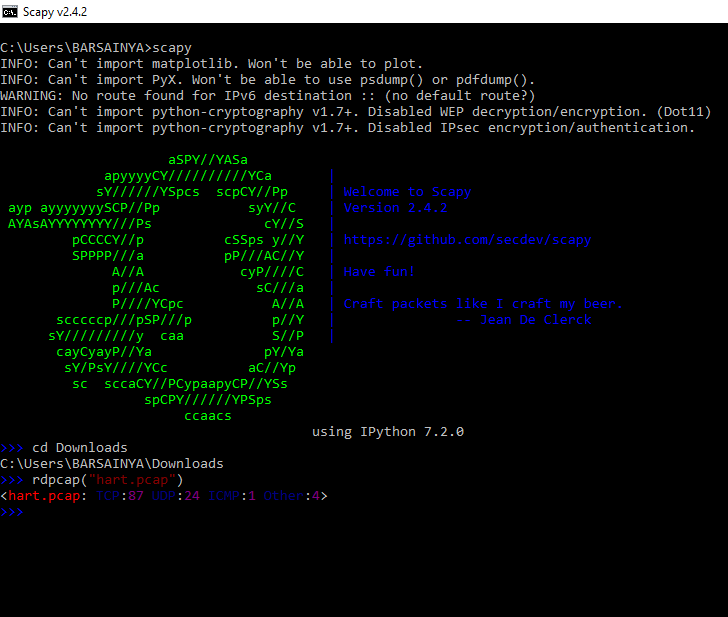
As from the
above result we can see that scapy imported the pcap file and gave us an object
defining some of it’s qualities. We can
see that it have 87 TCP packets, 24 UDP packets, 1 ICMP packet and 4 other
packets.

We have created a variable pcap
and stored the value returned by rdpcap function in it.
Conversations() function

We have
called the conversations function by using the dot notation. This function will
give us different conversations that are located in the pcap file. We can see
that what are main hosts and whom they are communicating to local loop back addresses.
Sessions() function

Above we
have used the sessions() function. With this function we can see full output
much different than the map itself, moreover we can observe that what machines
are communicating over which ports and what protocols being used.
Display() function

With display
function we can see the every packet based on time, this is similar to
wireshark using follow stream option.
If we want to analyze each packet individually
we can access them as a list.

Using list
we can see the encapsulation of each packet and their source & destination
address, what protocol being used and also some other information.
We can read
packet capture and can analyze what we have in our pcap file.
Now we will
perform the following tasks –
1) Read a packet capture
2) Find something interesting
3) View encapsulated data
4) Parse through our packet capture.

Now we will
save the particular packet as a variable in scapy interpreter .
Hexdump() function

Hexdump() function
will give actual binary view of the packet content.
Show() function

The show
function will return a full breakdown of the encapsulation in a much cleaner
way that is much easier to read and way than looking at the raw packet.
Now we have
an packet that is stored in a variable, we can access it’s source and
destination address even we can a access any information from our packet, we
just need to define the layer and value of the packet that we want to access.

Now we will
parse through our packet capture and will take out all the source IP so we can
align them later, this can be done using simple for loop.

Thanks,
MAYANK BARSAINYA
Founder, M7 SECURITY


Comments
Post a Comment